Skip to content
Facebook-f Twitter Instagram Youtube

Updating Large Format Printer & CNC Machine News Blog

  • Machines
    • 3D Printing
    • CNC Plasma Cutting
    • CNC Router
    • CO2 Laser Cutting
    • Direct to Film (DTF) Printing
    • Fiber Laser Cleaning System
    • Fiber Laser Cutting
    • Fiber Laser Engraving
    • Film Cutting
    • Flatbed Cutting Machine
    • Flatbed Printer
    • Heat Press
    • Laminator
    • Large Format Printer
    • Laser Marking
    • Power Equipment
    • Screen Printing
    • Vinyl Cutting
    • Welding
  • Consumables
    • ECO-Solvent Inks
    • Label Paper
    • Spindles
    • Sublimation
    • Toolings
    • UV Inks
  • Software & Resources
  • News and Updates
    • Events & Expo
    • Stock Updates
    • New Machinery
    • Warehouse Updates
    • Media & Press
  • Machines
    • 3D Printing
    • CNC Plasma Cutting
    • CNC Router
    • CO2 Laser Cutting
    • Direct to Film (DTF) Printing
    • Fiber Laser Cleaning System
    • Fiber Laser Cutting
    • Fiber Laser Engraving
    • Film Cutting
    • Flatbed Cutting Machine
    • Flatbed Printer
    • Heat Press
    • Laminator
    • Large Format Printer
    • Laser Marking
    • Power Equipment
    • Screen Printing
    • Vinyl Cutting
    • Welding
  • Consumables
    • ECO-Solvent Inks
    • Label Paper
    • Spindles
    • Sublimation
    • Toolings
    • UV Inks
  • Software & Resources
  • News and Updates
    • Events & Expo
    • Stock Updates
    • New Machinery
    • Warehouse Updates
    • Media & Press
Search
Facebook Twitter Instagram Youtube

Updating Large Format Printer & CNC Machine News Blog

  • Machines
    • 3D Printing
    • CNC Plasma Cutting
    • CNC Router
    • CO2 Laser Cutting
    • Direct to Film (DTF) Printing
    • Fiber Laser Cleaning System
    • Fiber Laser Cutting
    • Fiber Laser Engraving
    • Film Cutting
    • Flatbed Cutting Machine
    • Flatbed Printer
    • Heat Press
    • Laminator
    • Large Format Printer
    • Laser Marking
    • Power Equipment
    • Screen Printing
    • Vinyl Cutting
    • Welding
  • Consumables
    • ECO-Solvent Inks
    • Label Paper
    • Spindles
    • Sublimation
    • Toolings
    • UV Inks
  • Software & Resources
  • News and Updates
    • Events & Expo
    • Stock Updates
    • New Machinery
    • Warehouse Updates
    • Media & Press
  • Machines
    • 3D Printing
    • CNC Plasma Cutting
    • CNC Router
    • CO2 Laser Cutting
    • Direct to Film (DTF) Printing
    • Fiber Laser Cleaning System
    • Fiber Laser Cutting
    • Fiber Laser Engraving
    • Film Cutting
    • Flatbed Cutting Machine
    • Flatbed Printer
    • Heat Press
    • Laminator
    • Large Format Printer
    • Laser Marking
    • Power Equipment
    • Screen Printing
    • Vinyl Cutting
    • Welding
  • Consumables
    • ECO-Solvent Inks
    • Label Paper
    • Spindles
    • Sublimation
    • Toolings
    • UV Inks
  • Software & Resources
  • News and Updates
    • Events & Expo
    • Stock Updates
    • New Machinery
    • Warehouse Updates
    • Media & Press
Search

Hard Hat Screen Printer Unbox, Step by Step Assemble and Usage Guide

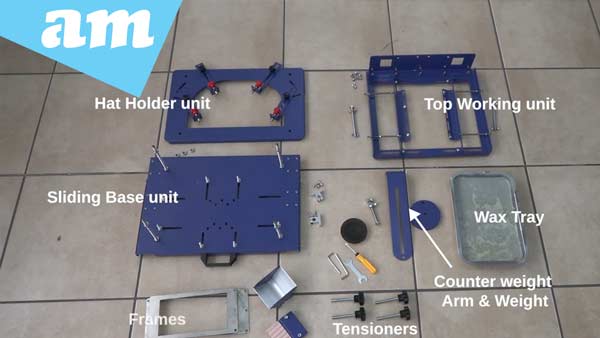
The Hard Hat Screen Printer from AM.CO.ZA arrives with a preassembled main base unit. Several components need to be attached to complete the assembly, including the sliding base unit, hat holder unit, top working unit, counterweight arm, weight, wax tray, tensioners, artwork frame, sponge, screws, nuts, tools, and accessories.
Watch the below video to see the Hard Hat Screen Printer in action:

Step 1: Attach the Tensioners

Start by fitting the tensioners onto the main unit. These should be placed on the sides, top, and back as indicated in the instructions.

Step 2: Install the Sliding Base Unit

Slide the base unit into the main base unit using the sliding rods on each side. This may require some adjustment due to the snug fit. Once aligned, hand-tighten the four long screws in the corners before securing them firmly with a spanner. Ensure the rod clamps are in place and tightened, with the rods passing through them.

Step 3: Attach the Hat Holder Unit

Position the hat holder unit on the four long screws and secure it using nuts on the top corners. The nuts at the bottom of the screws can be adjusted for levelling.

Step 4: Secure the Top Working Unit

Attach the top working unit to the main unit by aligning it with the designated holders. Use screws and nuts to secure it, starting with hand-tightening and finishing with an Allen key.

Step 5: Limit Downward Motion

Install the two long screws with wing nuts on the extending arms of the main unit. These screws can be adjusted to limit the downward motion of the hat holder unit.

Step 6: Attach the Counterweight Arm and Weight

Connect the counterweight arm to the main unit and secure it with a spanner. Attach the weight to the arm for balance and functionality.

Step 7: Position the Wax Tray

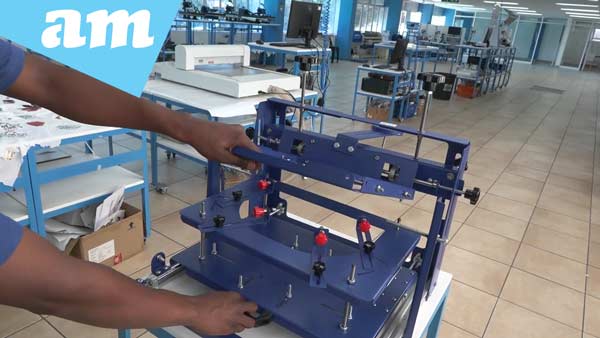
Place the wax tray onto the sliding base plate. This tray shapes to the hat and acts as a stopper, holding the hat in place. Position your hat on the tray and lock it using the locking extender. Fine-tune the fit with the red knobs for a secure hold.
Step 8: Fix the Artwork Frame

Attach the artwork frame to the top unit. Adjust the side holders to fit the size of your frame by loosening their nuts, repositioning them, and testing before tightening. Secure the frame to the holder arms using screws.

Step 9: Prepare for Screen Printing

Use double-sided tape to secure your artwork to the frame. Apply ink with the provided sponge to begin screen printing on your hard hat.

Step 10: Adjust the Sliding Unit Stoppers

The screws on the sides of the sliding unit serve as stoppers. Adjust their position to control the movement of the slider.

Final Steps

After assembly, test the unit to ensure all parts function smoothly. The top unit should move freely up and down, and the hat holder and base unit should slide effortlessly. Tighten all tensioners to maintain stability during operation.

Enjoy Your Screen Printer

Your Hard Hat Screen Printer is now ready for use. For any additional information or support, you can contact AM.CO.ZA. Visit their showrooms in Sunnyrock, Johannesburg, or Montague Gardens, Cape Town, or reach out via WhatsApp at 060 600 6000.

Purchase Hard Hat Screen Printer via the following link https://buythis.co.za/sp-hat-hard

Stay ahead in the printing world with AM.CO.ZA, the leader in CNC and printing machines for over 11 years.

In a time where AI and smart technologies are transforming industries, AM.CO.ZA has emerged as a leader in CNC routers and printing machines. With more than 11 years of experience, they offer a diverse range of advanced products, including CNC Routers, Large Format Printers, Vinyl Cutters, Laser Cutters, Plasma Cutters, and DTF Printers. Their solutions serve a wide array of sectors, from manufacturing and engineering to the creative arts.

Machines, Consumables and Parts Available from https://buythis.co.za/

For more info on Advanced Machinery visit https://am.co.za/

Subscribe to AM.CO.ZA’s YouTube Channel: https://www.youtube.com/@AchievementMatters?sub_confirmation=1

Chat with us by sending “hi” on WhatsApp to 060 600 6000​.

PrevPrevious Update
Next UpdateNext
  • Enquiry: 060 600 6000
  • Support: 076 666 6655
  • Training: 060 818 1818
  • Jo’burg : 087 802 5368
  • Cape Town : 087 802 5368
Chat to us by sending “hi” on Whatsapp: 060 600 6000​
Envelope Youtube Facebook Pinterest Twitter Instagram

This website is developed by Advanced Machinery (Pty) Ltd. The domain name updating.co.za is the property of Bates Trust IT003077/2015(G), and its exclusive use is licensed to Advanced Machinery (Pty) Ltd All other materials contained on this website and all associated websites, including text, graphics, icons, still and moving images, sound recordings, musical compositions, audio-visual works and software, are the property of Advanced Machinery (Pty) Ltd or its content suppliers or service providers and are protected by South African and international copyright laws. All trademarks, service marks, trade names, trade dress, product names and logos appearing on the site are the property of their respective owners.